Crispy fried flounder is a whole fish dish that I grew up with–mostly eating it at Chinese restaurants. The Cantonese pronunciation of this dry fried flounder dish is “gaun jeen loong li” or, in Mandarin, “gan jian long li” (干煎龙利).
“Dry fried” is the name, but the flounder is actually shallow-fried to the perfect crispiness. Some (okay, me) even go so far as to enjoy the fish tail and fins as a crispy fish chip!
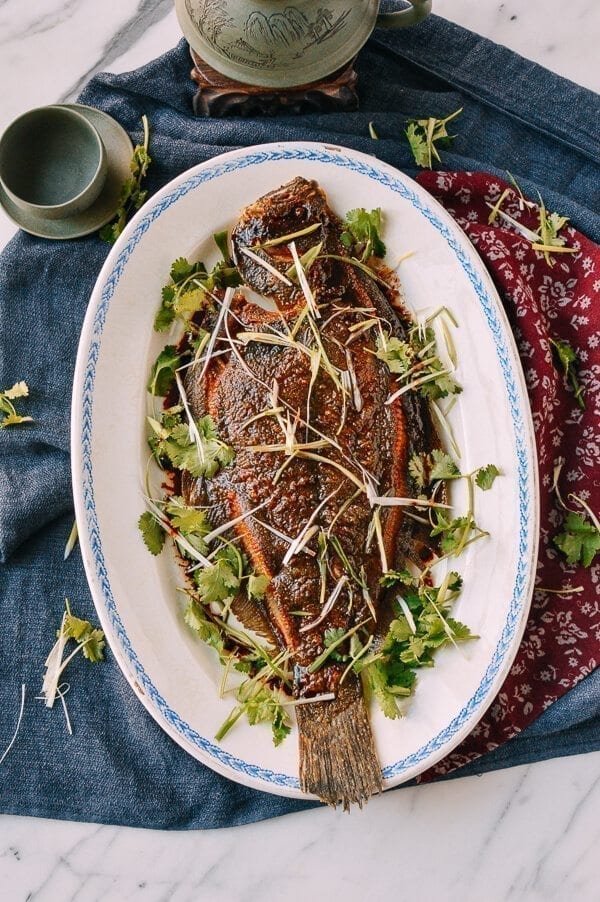
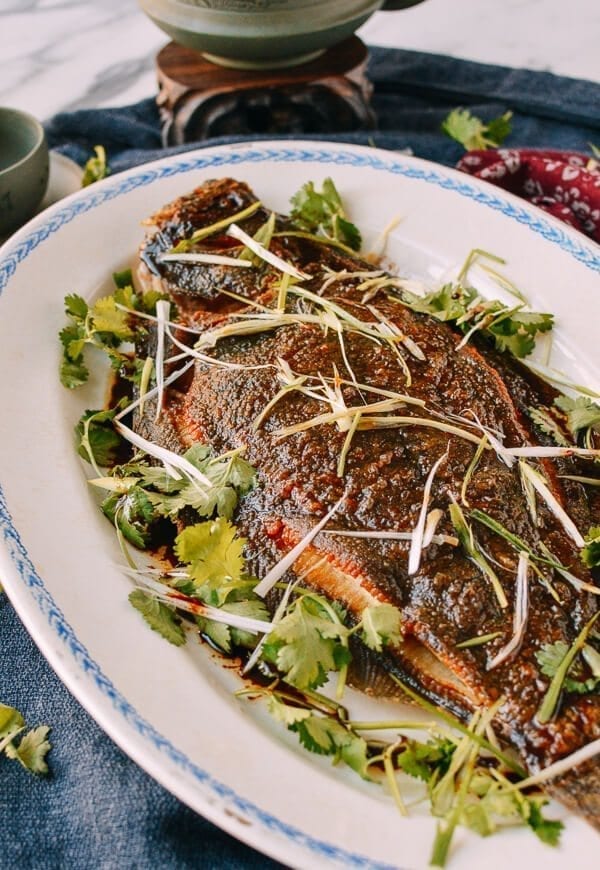
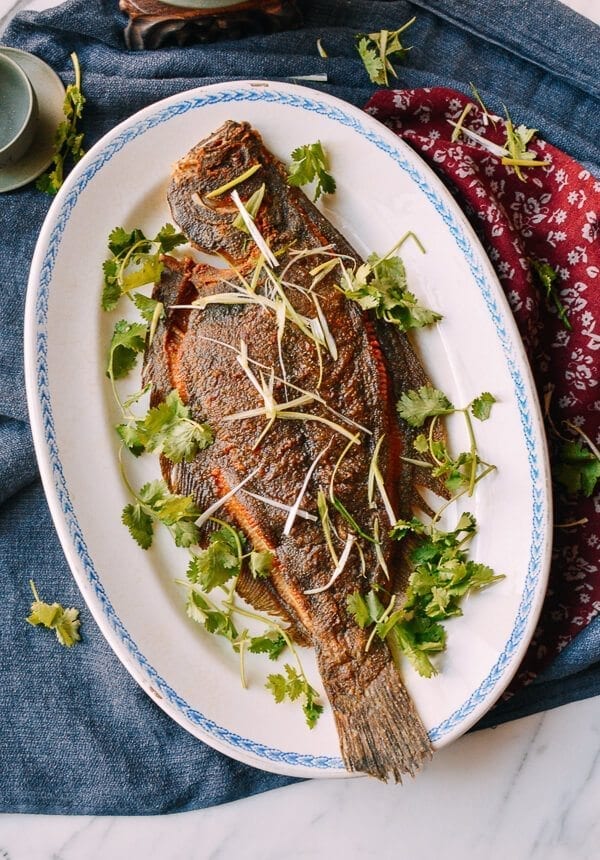
That crispiness is a signature feature of this dish, which I’ll help you achieve at home, as is the jelly-like portion of the meat near the fin (similar to skate, if you have ever tried it). The crispy fried flounder is then finished with a drizzle of a sweet soy sauce, made using some of the fry oil, and plenty of fresh cilantro and scallions. Serving a whole fried fish like this crispy fried founder is ideal for special occasions and Chinese New Year feasts.
Buying Whole Flounder
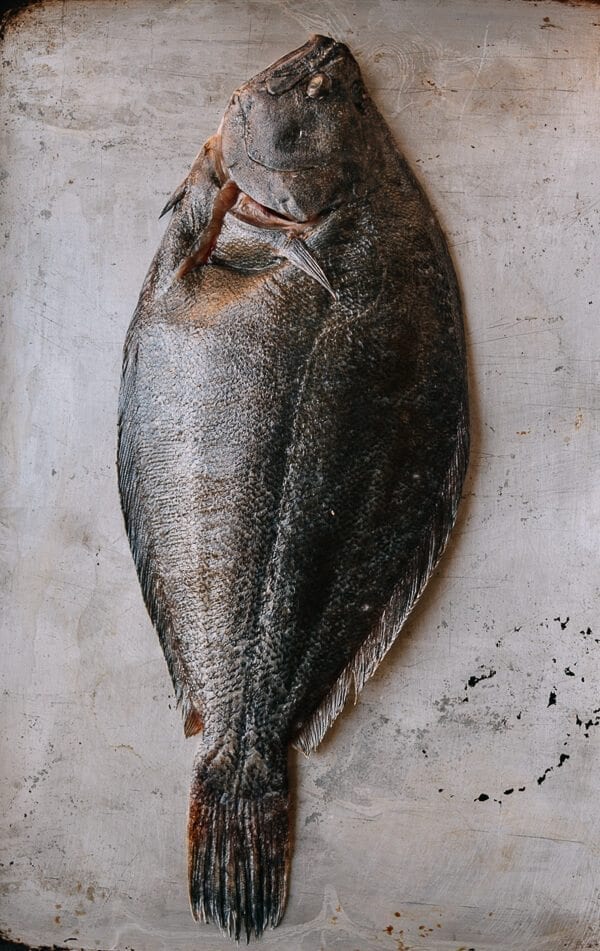
So, let’s talk about where to get a whole flounder, and what the difference is between flounder and sole. First off, there are no grey sole (a delicacy in Hong Kong) in waters off North America, only flounder and fluke (summer flounder).
You’ll be hard-pressed to find significant differences in taste among these fish, since, oftentimes, fluke and flounder fillets are also sold as “filet of sole.”
Freshness is almost always the key to the best tasting fish. Of course, the best tasting fish is freshly caught, but unless you have a deep sea fishing trip planned, you’re unlikely to get a catch of the day for this fried flounder dish.
Judy and I went fishing in Montauk last year, and we cooked up our catch of fresh Pan-fried Porgies. Maybe next time, we’ll have to go out in search of fluke or flounder and make this crispy fried flounder, or use our steamed whole fish method. That’s all to say that the only practical source for a good quality flounder is from your local fishmonger, Asian grocery store, or local supermarket.
So how do you make sure you’re selecting a fresh fish? I always look at the eyes first. If they are bright and clear, it’s a good bet that it’s your lucky day. Also look for bright red gills that are not too dark, shiny wet skin, and no fishy smell.
Press the fish lightly with your finger and it should not leave any indentation which is also and important freshness test. It can be tough to find perfect specimens in markets, so be diligent and use your own judgment with our tips to search for the freshest fish available for your dinner table!
Chinese Fried Flounder: Recipe Instructions
Getting the fresh fish will be the hard part. Cooking this crispy fried flounder is actually pretty easy (after the fish guy properly cleans it).
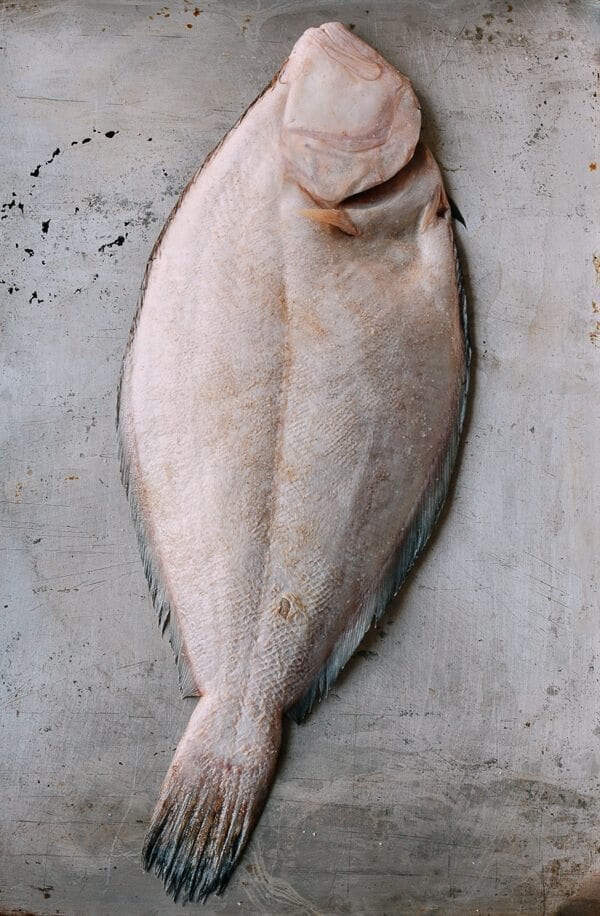
Remember that we Chinese always leave the head and tail on, so all that is needed is to gut the flounder and remove the gills and scales. A lot of people are intimidated by cooking whole fish, so let’s get to showing you how to do it!
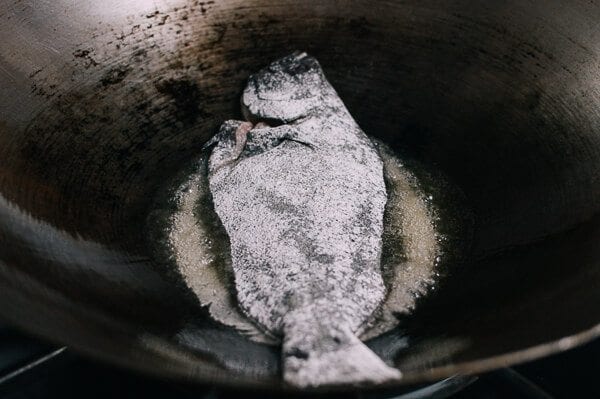
The first step is to pat the fish dry with a paper towel on both sides. Next, rub the Shaoxing wine all over the fish on both sides. Mix together the salt and white pepper and rub it all over both sides of the flounder.
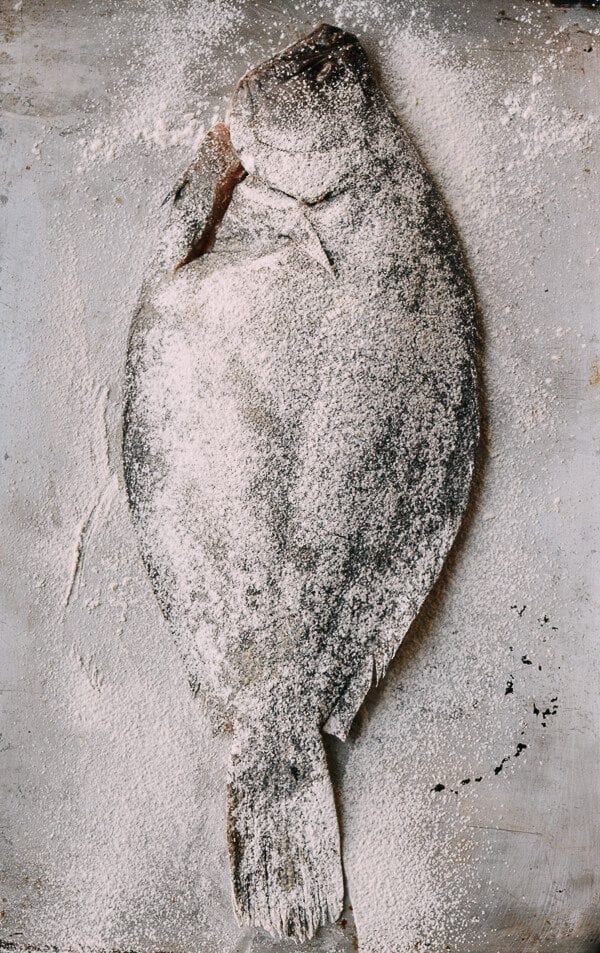
Next, lightly dredge both sides of the fish with cornstarch. I sifted the cornstarch over both sides of the fish to get a uniform, light coating.
If you don’t have a sifter or fine-meshed strainer to do this, you may need to use a lot more than 3 tablespoons of cornstarch to dredge the fish. You can also try patting it all over the fish with your hands and then shaking off the excess.
If you use this method, the fish must be dry or you will get large patches of corn starch on the fish which won’t look pleasing to the eye after frying!
Heat a carbon steel wok or very large frying pan over high heat until it just starts to smoke. Next, pour ⅔ cup canola oil around the perimeter of the wok to ensure it is fully coated and turn the heat down to medium high. Carefully place your fish in the wok.
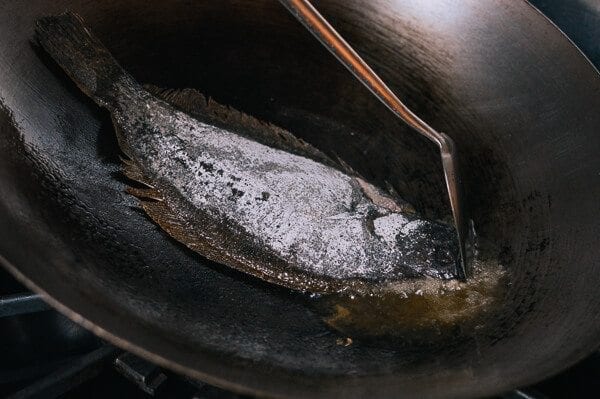
A fish of this size will need 5 to 6 minutes on each side. You should be getting a good sizzle in the wok, and the oil should be bubbling as you cook the fish. Tilt the wok or pan so the oil reaches all parts of the fish, and soon the flounder will begin to slide around the wok with ease.
At this point, you will have to use your wok spatula to hold the fish gently while you continue to tilt the wok to cook the fish evenly. Make sure that the side fins, tail, and fish head are fried evenly as well. This process takes some coordination, but it sounds harder than it is!
Note that this fried flounder recipe calls for ⅔ cup of oil, but if you double the amount, you can get better, crispier results and have a much easier time frying the flounder. However, keep in mind that all but a few tablespoons of oil will be discarded in the end.
You can check the fish by gently lifting up one side the flounder with a wok spatula (so it’s perpendicular to the fish) to see that it fried up to an even golden brown. If it’s ready, just continue the flipping motion steadily to turn it over. Flounder is large and unwieldy, so you can use two spatulas to do this.
Another tip is to tilt the wok up on the side you are flipping to make things easier. If you are right handed, tilt the left side of the wok up and use your right hand to flip the fish to your left. Continue frying for another 5 minutes, tilting the wok as needed to make sure the edges fry up to a crispy finish.
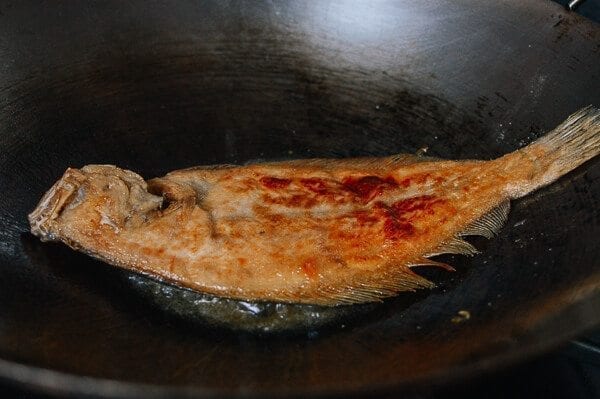
Once the flounder is done on both sides, carefully scoop/slide it from the wok to a large plate. Before you do this, there’s a presentation decision–do you serve the flounder dark side (the “top” of the fish) or light side up (the “bottom” that skims the ocean floor)?
Many restaurants like to serve it lighter side up, but I like to serve it dark side up. It’s the natural position of the fish, and it sits on the plate a bit better.
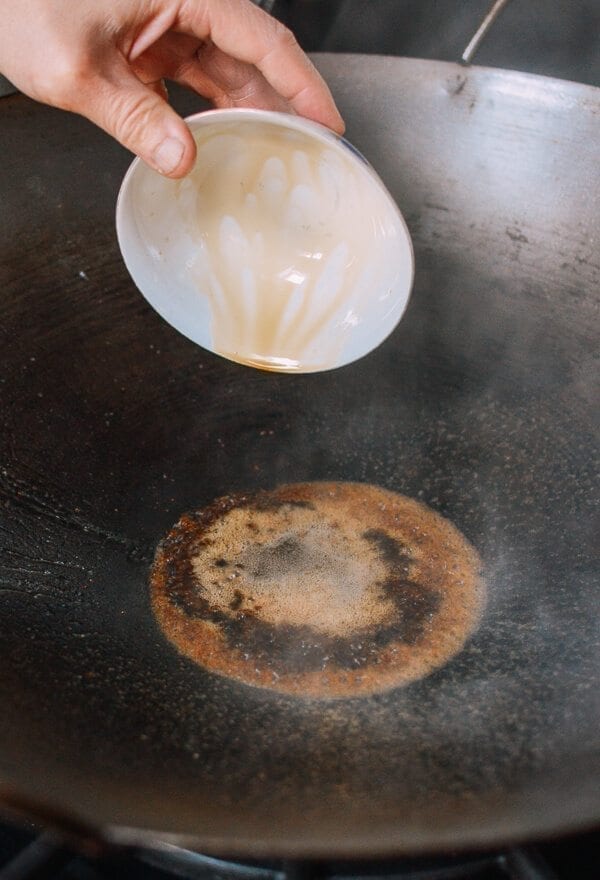
One you’ve plated the fish, scoop out the oil into a heatproof bowl, and wipe your wok clean with a paper towel.
Next, in a small bowl, mix the 2 teaspoons of hot water with the sugar, soy sauce and Shaoxing wine.
Use a spoon to skim out 3 tablespoons of oil from the bowl you set aside, taking care not to pick up any particles, and pour back into the wok, set over medium high heat. When the wok is just smoking, pour the sauce mixture in, stirring it until it comes to a boil, then turn off the heat.
Use the spatula to spread half of the sauce evenly over the fish, topping it off with the finely julienned scallions and chopped cilantro. Reserve the other half of the sauce for after you debone the fish. Alternatively, you can let your guests fiddle with the bones themselves, and spoon the sauce over as they like.
Serve your crispy fried flounder immediately!
How to debone and serve your crispy fried flounder:
If you want to debone your fish, once you are ready to eat (like when it comes time to carve the turkey at Thanksgiving dinner), use a knife to make a cut down the middle of the flounder and two cross cuts–one at the tail and one at the base of the head.
With a metal spatula, move the two filets to the side of the plate, exposing the main fish bone.
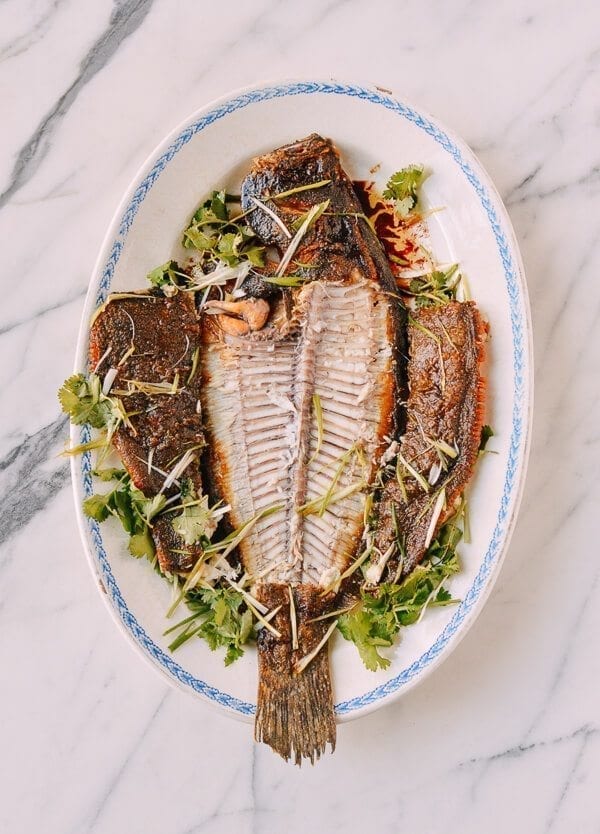
Use a knife or kitchen shears to break the main bone near the head and tail of the fish and carefully lift the bone, leaving the bottom filet on the plate. Since you took so much care cooking your fish to perfection, it should lift out easily!
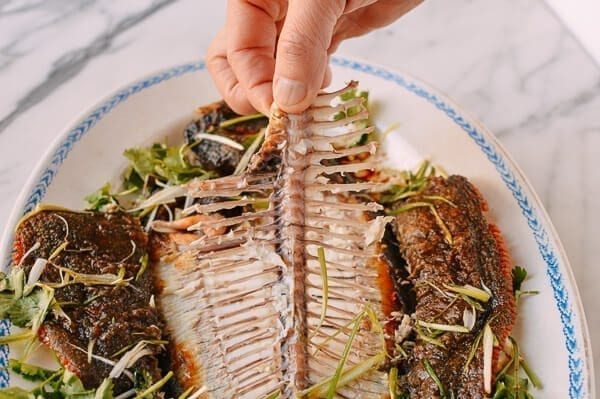
Drizzle the other half of the sauce onto the fish, and triumphantly serve!
Looking for more authentic recipes? Subscribe to our email list and be sure to follow us on Pinterest, Facebook, Instagram, and Youtube!
Recipe

Crispy Fried Flounder, Chinese-Style
Ingredients
You’ll need:
- 1-1¼ pounds whole flounder, sole or fluke (500g)
- 2 teaspoons Shaoxing wine
- ¾ teaspoon salt
- ½ teaspoon white pepper
- 3 tablespoons cornstarch
- ⅔ cup canola oil (160ml)
For the sauce:
- 1½ tablespoons hot water
- ¼ teaspoon sugar
- 1½ tablespoons soy sauce
- 2 teaspoons Shaoxing wine
- 3 tablespoons oil from the oil you used to fry the flounder
- 1 scallion (finely julienned)
- 1 small handful cilantro (roughly chopped)
Instructions
- The first step is to pat the fish dry with a paper towel on both sides. Next, rub the Shaoxing wine all over the fish on both sides. Mix together the salt and white pepper and rub it all over both sides of the flounder.
- Next, lightly dredge both sides of the fish with cornstarch. I sifted the cornstarch over both sides of the fish to get a uniform, light coating. If you don’t have a sifter or fine-meshed strainer to do this, you may need to use a lot more than 3 tablespoons of cornstarch to dredge the fish. You can also try patting it all over the fish with your hands and then shaking off the excess.
- Heat a carbon steel wok or very large frying pan over high heat until it just starts to smoke. Next, pour ⅔ cup canola oil around the perimeter of the wok to ensure it is fully coated and turn the heat down to medium high. Carefully place your fish in the wok.
- A fish of this size will need 5 to 6 minutes on each side. You should be getting a good sizzle in the wok, and the oil should be bubbling as you cook the fish. Tilt the wok or pan so the oil reaches all parts of the fish, and soon the flounder will begin to slide around the wok with ease. At this point, you will have to use your wok spatula to hold the fish gently while you continue to tilt the wok to cook the fish evenly. Make sure that the side fins, tail, and fish head are fried evenly as well. This process takes some coordination, but it sounds harder than it is!
- Note that this fried flounder recipe calls for ⅔ cup of oil, but if you double the amount, you can get better, crispier results and have a much easier time frying the flounder. However, keep in mind that all but a few tablespoons of oil will be discarded in the end.
- You can check the fish by gently lifting up one side the flounder with a wok spatula (so it’s perpendicular to the fish) to see that it fried up to an even golden brown. If it’s ready, just continue the flipping motion steadily to turn it over. Flounder is large and unwieldy, so you can use two spatulas to do this. Another tip is to tilt the wok up on the side you are flipping to make things easier. If you are right handed, tilt the left side of the wok up and use your right hand to flip the fish to your left. Continue frying for another 5 minutes, tilting the wok as needed to make sure the edges fry up to a crispy finish.
- Once the flounder is done on both sides, carefully scoop/slide it from the wok to a large plate. Before you do this, there’s a presentation decision–do you serve the flounder dark side (the “top” of the fish) or light side up (the “bottom” that skims the ocean floor)? Many restaurants like to serve it lighter side up, but I like to serve it dark side up. It’s the natural position of the fish, and it sits on the plate a bit better.
- One you’ve plated the fish, scoop out the oil into a heatproof bowl, and wipe your wok clean with a paper towel.
- Next, in a small bowl, mix the 2 teaspoons of hot water with the sugar, soy sauce and Shaoxing wine.
- Use a spoon to skim out 3 tablespoons of oil from the bowl you set aside, taking care not to pick up any particles, and pour back into the wok, set over medium high heat. When the wok is just smoking, pour the sauce mixture in, stirring it until it comes to a boil, then turn off the heat.
- Use the spatula to spread half of the sauce evenly over the fish, topping it off with the finely julienned scallions and chopped cilantro. Reserve the other half of the sauce for after you debone the fish. Alternatively, you can let your guests fiddle with the bones themselves, and spoon the sauce over as they like.
- Serve your crispy fried flounder immediately!
Nutrition Facts


